Python Virtual Environments#
These instructions have primarily been developed using a Windows comptuer (May, 2024), but notes have been added for MacOS users. In addition, terminal commands are provided for Windows Command Promt as well as Git Bash (since Git Bash uses UNIX commands, this should cover most MacOS and Linux users.
Visit the Python page for virtual environments (note this is a direct link to an older version of the documentation 3.11 instead of 3.12). You should read the first section of text. In particular, note the bullet list statements, which have been rephrased to indicate the relevance for our purposes:
A virtual environment is meant to support a project
A virtual environment is contained in a sub-directory
.venvA virtual environment is not tracked by Git!
A virtual environment is considered disposable
A virtual environment directory (
.venv) should be recreated, not moved or copied
Reread that, because it is important! It means that a venv is simply a set of files that you will set up, add to, and change frequently during the course of a project. Perhaps many of you have still been using your mude environment from Q1: since the pace of the most common Python libraries. However, other packages change their code base frequently, leading to problems with our code. Remember pyvinecopulib in MUDE Week 1.8 this year? That package often causes problems because it depends on a number of libraries in the C programming language, which are very hardware-dependent (but also computationally efficient) - when using projects where package compatibility is known to be sensitive, it is much more reliable to plan using a new environment from the start, and venv is the quickest way to do that.
Establish a working directory#
Before we begin, let’s get our working directory set up properly. You are not required to follow these suggestions exactly, but the relative paths between your working directory and the Python directory will be used throughout the code examples.
For CIE42X0-PD we recommend setting everything up within a working directory, perhaps called HOS, that is perhaps parallel to your MUDE directory. For example:
StartingFrom your C drive...at a location NOT on a cloud server!^
|
...
├── code/                    <-- maybe you call this something else
	├── .../
	├── MUDE/                <-- you should have also done this for MUDE
	│   ├── Week_1_1
	│   ├── ...
	│   └── Week_2_8
	├── HOS/
	│   ├── WS01              <-- not a git repo^^
	│   ├── WS02              <-- a git repo, linked to GitHub Classroom
	│   ├── WS03              <-- a git repo, also on GitHub Classroom
	│   └── ...
	├── python_releases       <-- described in next section
	│   ├── 311               <-- for Python 3.11. Not a git repo^
	│   └── ...               <-- maybe someday you use other versions

^ It is generally not a good idea to store code on a cloud server like
  OneDrive, Dropbox, etc. In our applications in particular you will be
  "backing up" a lot of unnecessary files (all of the Python source code
  and packages!).

^^ WS01 backup: if you store WS01 in this directory, you should create
  your own GitHub repo to serve as a backup of your work, or move it to a
  backed up location on your computer, since this was not cloned from a
  CIE42X0-PD repo.
Installing Python (Yes, again!)#
Remember that your environment also includes a specific version of Python (in our case, 3.11); this means you may have many versions of Python installed on the same computer. The secret to effectively using virtual environments is organizing the Python source code properly; note in the file system diagram above that we reserved a place parallel to the working directories for this: python_releases.
First you will have to download a specific version of Python:
Visit the Python downloads page at python.org/downloads{:target=”_blank”}
Choose Python 3.11
Download the appropriate file
“Windows installer (64-bit)” will be the proper choice for most of you). Note it’s only 25 MB. Once installed (per the instructions below) it should be around 130 MB
MacOS users have it easy: there is only one option
For these instructions, the version downloaded (May, 2024) was
3.11.9, which will be seen when executingpython --versionbelow
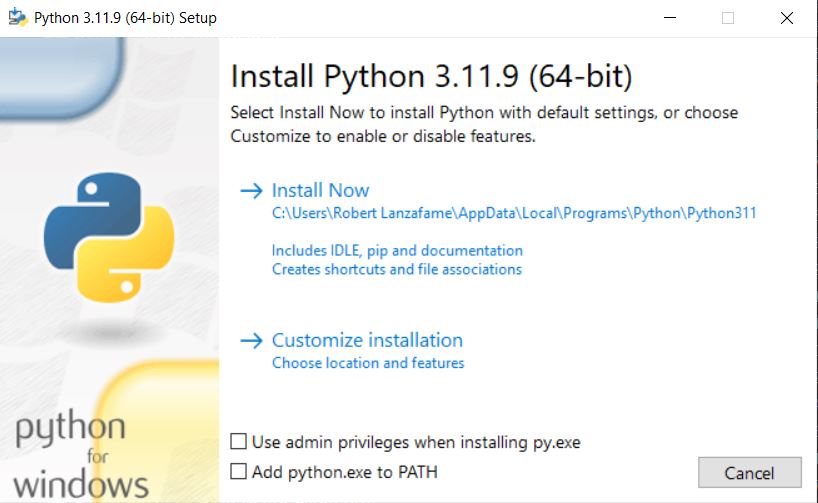
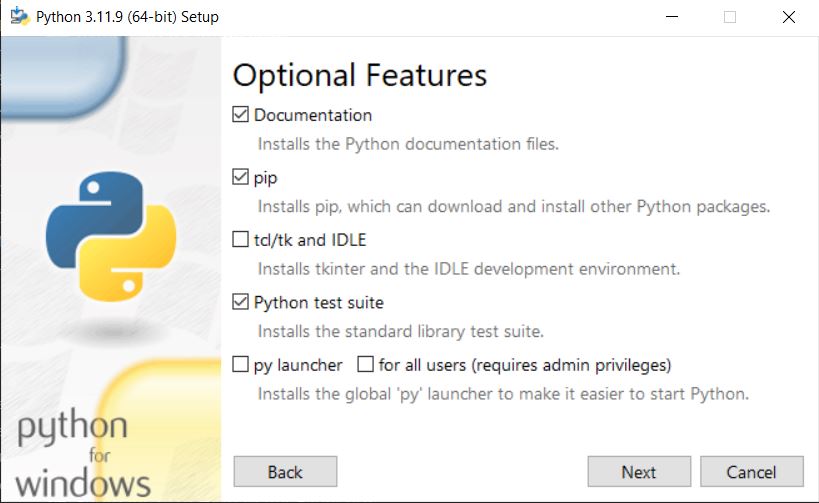
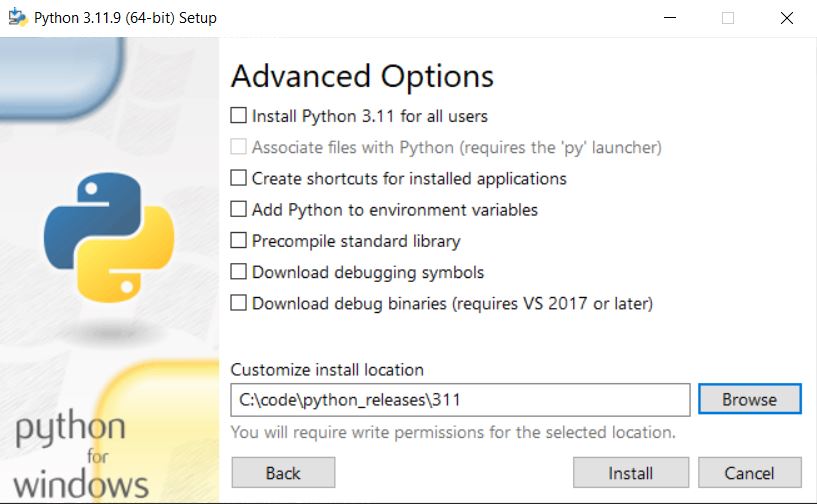
Next we will install Python by opening the downloaded file, but pay careful attention to the instructions. Each page of the installer is described here, along with a screenshot:
Installation page
uncheck “Use admin privileges…”
choose custom install

Fig. 5 Installation page.#
Optional Features page
uncheck “td/tk and IDLE” and “py launcher”
Ensure that “for all users” remains unchecked

Fig. 6 Optional features page#
Advanced options page
leave everything unchecked
Set install location as defined above, in
python_releasesin a sub-directory311to denote the version numbershould look like
C:\...\code\python_releases\311you may or may not have
codein subdirectories, which is OK— as long as its not in a cloud syncing directory

Fig. 7 Advanced options page.#
Ignore the last page “Setup Successful”
Checking Installation#
Now that you have installed Python, let’s check quickly whether other versions are available on your system or not:
Open a terminal: Terminal on MacOS; Windows users should use Command Prompt or Git Bash (not Powershell!)
Execute
python --version. Depending on your computer setup (e.g., Anaconda, Python, etc), you may or may not get a response.
Don’t worry if you get the following message; the installation instructions below will “fix” it:
'python' is not recognized as an internal or external command, operable program or batch file.
If you saw this message, you can skip to the next section. Otherwise, it read the following:
If you have Python installed in a way that your operating system can find it (i.e., on the system PATH), then you should see something like this (e.g., if you followed the MUDE instructions for Anaconda): Python 3.XX.YY. Depending on when you most recently installed Python, you will probably see something in the 3.9.YY to 3.11.YY range.
To see where your Python installation can be found, execute where python, where you should see something like the following for your own USERNAME (don’t worry about small differences; the important thing is to see the path to python.exe or python3.exe): C:\Users\USERNAME\Anaconda3\python.exe
It is good to be mindful of the whether some version of Python is available on your system, as sometimes you start using it when executing code without realizing it (i.e., you forget to activate your environment, and none of the packages you previously installed are available!).
Setting up a test virtual environment#
Following the file system diagram above, create a directory test that is at the same level as python_releases, then navigate there with a terminal of your choice. Creating a virtual environment is easy!
For Windows users:
..\python_releases\311\python.exe -m venv .venv
Note: the -m option runs Python command as a script. In other words, it does not open the Python interpreter (try running python and see the difference. You can try executing a print() statement, then type exit() when you are done.
You have just installed a Python environment. You can see this by looking in your File Explorer (make sure hidden folders are visible), or typing ls --all (dir on Windows Command Prompt).
At the moment, the environment is not activated. To do so…
Windows:
.venv\Scripts\activate
Mac OS or Git Bash on Windows:
source .venv/Scripts/activate
You should now see (.venv) in your terminal interface (regardless of system).
Try python --version…if you used the same installation as these instructions, you should see Python 3.11.9 returned.
Now try installing a couple Python packages:
pip install numpy scipy
Note that this is a different package manager than Anaconda, so depending on your internet speed you may need to wait to download large packages. However, once you create other environments (i.e., for the next workshop), you will notice that the creation of new environments and installation of additional packages is much faster than Anaconda!
What to do with the test environment?#
Remember those bullet points at the top of this page? Virtual environments are disposable, and should be created often, so let’s delete this one! See the commands in the next section to deactivate, then delete, the environment.
Summary of Commands and Workflow:#
That’s pretty much it! We will guide you through these steps in future assignments. For now, the following steps should suffice as a quick reference and outline of the typical workflow we expect—make it a habit, and you won’t regret it!
Create a virtual environment:
PATH_TO_YOUR/python -m venv .venv
Activate:
source .venv/Scripts/activate
Check that it worked (python.exe is located at .../WORKING_DIR/.venv/Scripts/)
where python
Confirm Python version in .venv:
python --version
Check installed packages:
python -m pip list
Install packages from requirements.txt:
python -m pip install -r requirements.txt
Check that everything worked as expected by running python -m pip list again.
Deactivate environment:
deactivate
Delete environment (MacOS or Git Bash). Use with caution! there is no un-doing this!:
rm -r .venv
In Windows Command Prompt, you can delete in the File Explorer, or try this. Use with caution! there is no un-doing this!:
rmdir /Q/S .venv
where /Q prevents the “are you sure?” dialog from checking, and /S clears and removes all sub-directories.
