Build pull requests from forks#
When writing a TeachBook it is useful to automatically build and view these changes online. This exactly why we designed and build the deploy-book-workflow tool, which also allows for multiple versions of your book to exist at any time with customizable URL’s. However, it doesn’t cover all use cases. Luckily, Read the Docs is a free tool that can easily be used for this purpose. It also provides a very easy way to view differences between versions on each page!
Pull Requests are a key tool for allowing anyone with a GitHub account to make a contribution to your work by forking your repository, adding commits, then sending them back to your repository via a Pull Request. Unfortunately you are not able to automatically build the book based on proposed changes in a pull request from a fork of your repository, as this requires the deploy-book-workflow in the fork to have GitHub Actions enabled to show the proposed changes in the book. Furthermore, when proposing your contribution in a pull request, you’d have to manually refer to your own built book (e.g., with a hyperlink). This process can be made easier by using Read the Docs, as it can automatically build a book based on changes proposed in a pull request, and includes a link to the book directly in the pull request page.
Read the Docs is not recommended for final versions of your book because of the advertisement in the free version. If you’d like to pay for it, it can replace the functionality of the deploy-book-workflow.
This tool works using Sphinx, which is the core engine for Jupyter Book v1; it is carried out using a Jupyter Book command to generate a Sphinx configuration file, for example:
jupyter-book config sphinx book/
In theory this should work with the TeachBooks Python package teachbooks as well as local extensions (e.g., those in book/_ext like APA References), but we have not checked this yet. If you are interested, try setting it up as a PR related to this issue.
Tip
Once set up, this tool is only accessible via the Pull Request page for a repository in the ‘Checks’ part of the automated rule set box (illustrated below under ‘Usage’). This is different from our deploy-book-workflow, which is accessed under the Actions tab of a GitHub repository.
A Read the Docs account and admin privelages for a repository are the only requirements needed set this up; all visitors to the pull request page will be able to view the book, including the differencing feature.
Usage#
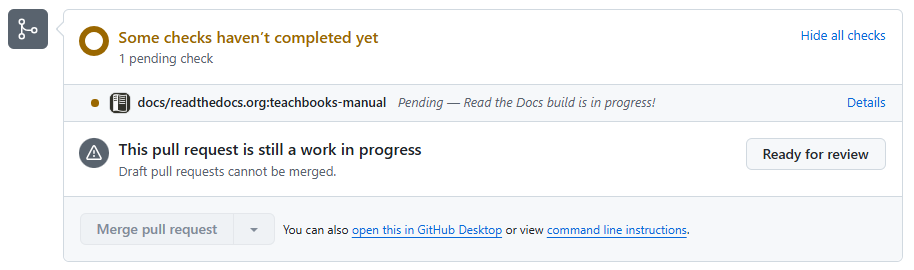
After visiting the summary page of a pull request you will be able to see the following line (make sure you click “show all checks” to see it!):
Click ‘Details’ to see the logs of the build process.
Whenever the build is done, click ‘Details’ again to see the build book. Tip, click d or add ?readthedocs-diff=true to the url to see the differences on the pages highlighted. Note that this differencing functionality is not perfect as it might indicate elements which are not changed intentionally. It is known to have issues visualizing changes associated with buttons, LaTeX and figures.
Example#
As an example, Read the Docs is configured in this example book. Fork it and open a pull request to test it’s functionality.
There’s an example pull request with corresponding built book on Read the Docs.
Setting up#
This tool is a specific automation rule that is enabled within the GitHub pull request ecosystem.
Add configuration file to your repository#
Add a file .readthedocs.yaml to the root of your repository, containing the following content:
version: 2

build:
  os: ubuntu-24.04
  tools:
    python: "3.13"
  jobs:
    pre_build:
      - "jupyter-book config sphinx book/"

python:
  install:
    - requirements: requirements.txt

sphinx:
  builder: html
  fail_on_warning: true
  configuration: book/conf.py
You might need to add standard-imghdr to your requirements.txt file if the build fails when you’ve configured it in Read the Docs (if the error tells you ModuleNotFoundError: No module named 'imghdr')
Setup Read The Docs account#
Setup an account at app.readthedocs.org/accounts/login/. We recommend using your GitHub account for authentication.
When authorizing Read the Docs for your GitHub account, you can also grant access by Read the Docs for an organization of which you are an owner, as well, which we also recommend.
Add project in Read The Docs#
On your dashboard, add a new project. Find your GitHub repository (you might need to refresh your repositories if you’ve recently updated authorizations).
Enable Pull Request build#
In the setting of your newest project, enable build of pull request by selecting the option in Building - Pull request builds - Build pull requests for this project.
Additional settings#
The following settings are recommended:
Setup-Settings-URL versioning scheme-Multiple versions without translations (/<version>/<filename>), as translated books can be implemented with Multilingual bookSetup-Settings-Addons-Search- disabled, as your books already contain a search function and the Read the Docs search functions requires additional setupSetup-Settings-Addons-Link previews- disabled,Multiple versions without translations (/<version>/<filename>), as previews can be implemented with Rich hover over tipsSetup-Settings-Automation rules-Add rule, to build all tagged versions of your book:Description: ‘Build all tags’Match:Custom MatchCustom match:.*Version type:TagAction:Activate version